



Hello, I’m Dr. Shin Dong-woo, the leading surgeon at Planet Plastic Surgery Clinic.
When researching facelift surgery, before-and-after photos are usually the very first portfolio patients review. However, most people analyze them with basic, surface-level impressions: “Does she look younger?” or “Is her jawline sharper?”
While these visual impressions feel meaningful, they actually tell you very little about the structural precision, safety, and ultimate quality of the surgery.
You cannot assess medical mastery simply by looking at a filtered, overall smile. Today, I want to pull back the curtain and share the five clinical checkpoints I use professionally to evaluate facelift results. These concrete, immediately applicable markers will completely change how you analyze facelift reviews and before-and-after portfolios.
The 5-Point Checklist to Spot a Masterfully Executed Facelift
[1. Mole Drift]      ──> Verifies real vertical tissue movement
[2. Nasolabial Fold] ──> Proves wide, deep structural dissection
[3. Earlobe Shape]   ──> Detects high-tension mistakes (Pixie Ear)
[4. Jowl Resolution] ──> Assesses lower jawline definition
[5. Eyelid Crease]   ──> Evaluates brow lift tissue suspension
Checkpoint #1: The Positioning of Moles and Skin Markings (Mole Drift)
The first place I look is not the jawline, but the position of natural, fixed skin landmarks—such as moles, freckles, or hyperpigmentation spots—on the cheeks or near the corners of the mouth.
- Why It Matters: These markings are permanent anatomical anchors. Because they are part of the skin matrix, they serve as the most objective odometer of how much the tissue was actually lifted.
- What to Look For: If a mole that sat near the corner of the mouth prior to surgery has shifted upward and diagonally in the post-operative photo, it is solid proof that the underlying tissue was genuinely repositioned. If the mole hasn’t budged but the jawline looks tight, the skin may have simply been stretched horizontally without a true structural lift.
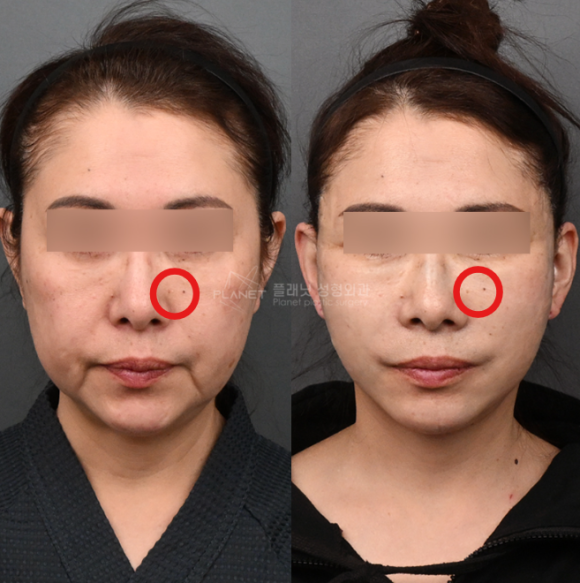
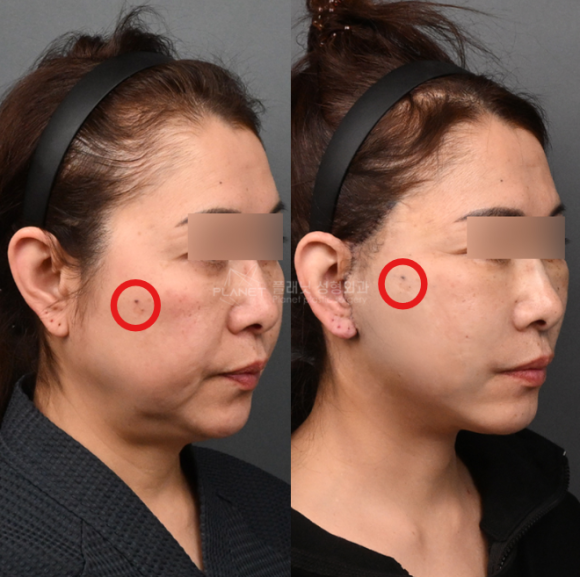
LEFT : BEFORE / RIGHT : FACELIFTING AFTER 1DAY
Checkpoint #2: Deep Softening of the Nasolabial Folds
The second crucial marker is the depth and transition of the nasolabial folds—the deep crease running from the wings of the nose down to the corners of the mouth.
- Why It Matters: The midface and nasolabial zone sit near the center of the face. Because this area is far from the ear (the incision point), it is impossible to improve with a conservative or limited mini-facelift. To soften these folds, the surgeon must perform a wide, deep-plane SMAS dissection that extends far forward.
- What to Look For: Look closely at the nose-to-mouth crease. If the fold is visibly smoothed and blended naturally into the cheek, it indicates that the surgeon thoroughly released the deep retaining ligaments and repositioned the descended midface fat pad back to its youthful coordinate.
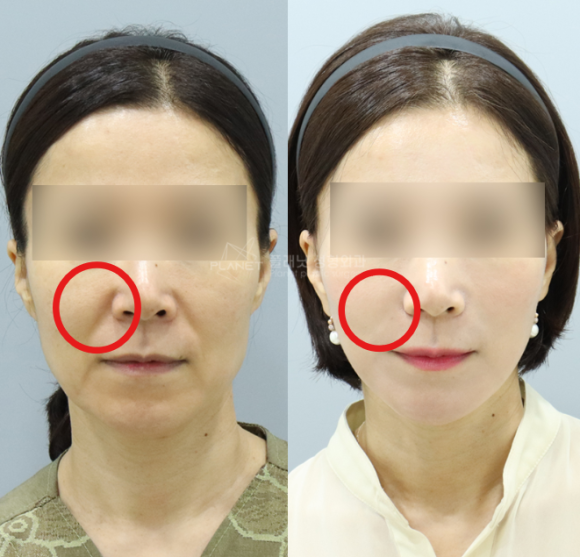
LEFT : BEFORE / RIGHT : FACE LIFTING AFTER 6MONTHS
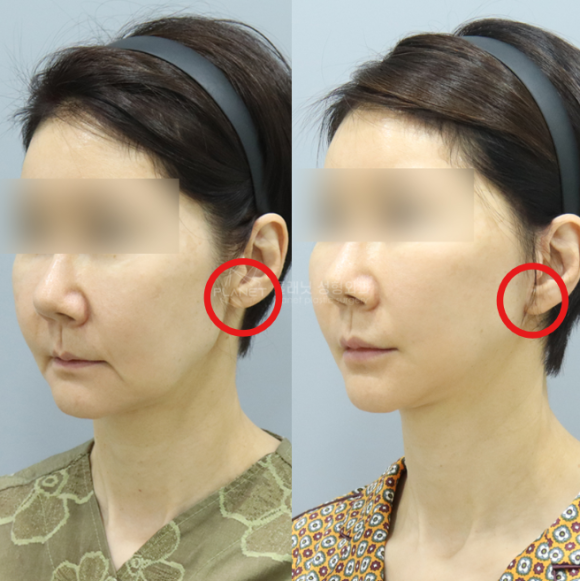
Checkpoint #3: The Shape and Free-Hang of the Earlobe
The third checkpoint is one that surprises most patients: the anatomy of the earlobe.
- Why It Matters: While many people zoom in to check for scars, the shape of the earlobe tells the real story of surgical tension. If a surgeon pulls the outer skin too tightly to hold the lift—rather than anchoring the weight deep within the SMAS muscle layer—that downward pulling force will drag the earlobe toward the cheek. This creates an elongated, pulled deformity known as a “Pixie Ear.”
- What to Look For: Examine the post-op earlobe. Does it hang naturally and look softly detached, identical to its pre-op structure? Or does it look stretched, pointed, and unnaturally tensioned downward? A perfectly natural, round earlobe is a hallmark of excellent zero-tension skin closure.
Checkpoint #4: Crisp, Interruption-Free Jowl Resolution
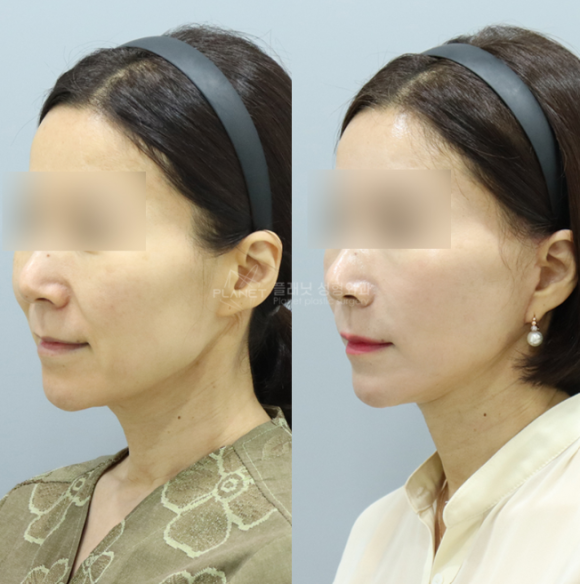
The fourth area to analyze is the jowling—the sagged fat pockets on either side of the chin that interrupt the jawline.
- Why It Matters: A successful facelift should completely resolve the jowls to restore a continuous, crisp mandibular curve. If you still see a minor bulge or wave along the jawline in the “after” photo, the lift was either under-corrected or a necessary complementary treatment was omitted.
- What to Look For: Check if the jawline is a clean, uninterrupted sweep from the chin to the ear. In cases where heavy, stubborn pocket fat caused the jowl, look for whether the surgeon paired the lift with precise lower-face micro-liposuction to carve out the ultimate structural contour.
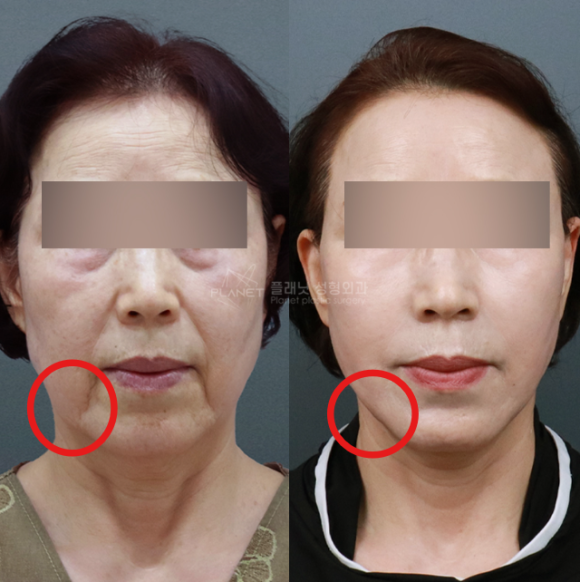
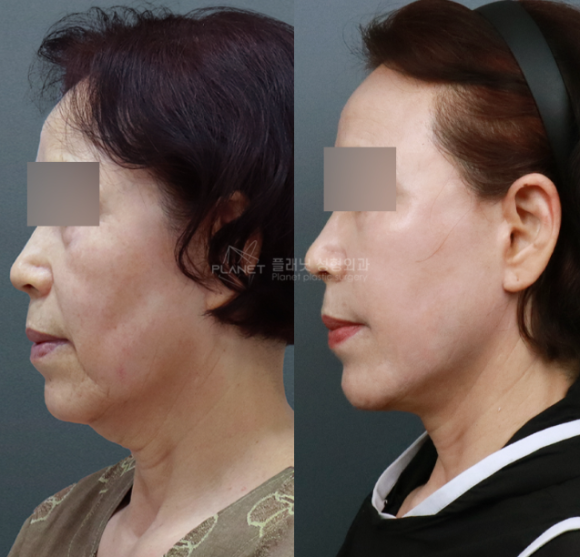
LEFT : BEFORE / RIGHT : FACE NECK LIFTING AFTER 6MONTHS
Checkpoint #5: The Definition of the Upper Eyelid Crease (For Brow Lifts)
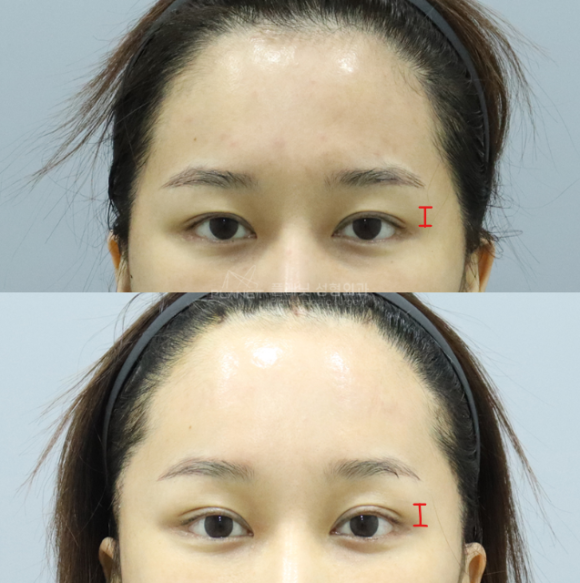
This fifth checkpoint applies specifically to patients reviewing forehead and Endoscopic Brow Lift results.
- Why It Matters: A masterfully executed brow lift does not just lift the eyebrows; it lifts the entire heavy canopy of the upper face. As the descended forehead and brow tissues are elevated, the heavy hooding over the eyes is cleared.
- What to Look For: Do not just look at whether the eyes look “bigger.” Look at the upper eyelid crease. If the crease was previously buried, heavy, or completely hidden under droopy skin, a successful lift will reveal a clean, beautifully defined, and natural-looking eyelid crease, opening up the entire gaze.
At-a-Glance: Superficial Pull vs. Deep-Plane Masterpiece
| Checked Zone | Signs of a Rushed “Skin-Only” Pull | Signs of a Master-Level Structural Lift |
| Moles / Markings | Stay in the exact same spot; look stretched horizontally | Shifted vertically and diagonally with the tissue |
| Nasolabial Folds | Still deep; cheeks look flat or pulled outward | Softened and smoothed via deep midface mobilization |
| Earlobe Anatomy | Elongated, pointed, dragged down (Pixie Ear) | Perfect and round; hangs freely with zero pulling tension |
| Jowling Profile | Minor bulges or waves remain along the jaw | Crisp, razor-sharp contour from chin to ear |
| Eyelid Crease | Brows look unnaturally surprised; eyelids still heavy | Hooding is cleared, revealing a clean, defined crease |
Conclusion: Look Deeper to Protect Your Face
Before-and-after photos contain an immense vault of clinical information. By looking past the immediate “first impression” and using these five precise checkpoints, you can easily separate average results from master-level surgical art.
When reviewing facelift portfolios, remember: the goal is to find a surgeon who achieves structural restoration underneath the skin while leaving your natural anatomical features completely undistorted.
If you are currently evaluating your options and want an honest, anatomical breakdown of what a customized facelift can achieve for your unique facial coordinates, I invite you to visit us.
Please feel free to leave your questions in the comments below or contact Planet Plastic Surgery Clinic directly. We are always here to help you see the truth behind the results.
Thank you for your time.
Written by Dr. Shin Dong-woo, Leading Surgeon at Planet Plastic Surgery Clinic.
FAQ
A. The earlobe is the ultimate telltale sign of surgical tension. If a surgeon does not pull and secure the deep SMAS muscle layer properly, they are forced to pull the surface skin extremely tight to hold the lift. This excessive tension drags the earlobe downward and forward, resulting in a stretched, pointed “Pixie Ear” deformity. A natural, rounded, free-hanging earlobe in post-op photos proves the surgery was closed with zero skin tension.
A. A facelift can drastically soften and smooth deep nasolabial folds, but it should never erase them completely. A natural face requires a soft transition line when smiling. To achieve the best reduction, the surgeon must perform a wide Deep-Plane or Dual-Plane dissection to release the deep retaining ligaments of the cheek and lift the fallen fat pads vertically. A limited mini-lift will not reach or improve this area.
A. Unnatural results usually stem from an incorrect lifting vector or excessive superficial skin tension. If the tissue is pulled too horizontally, it flattens the cheeks and pulls the mouth into a wide, unnatural “windblown” smile. A natural-looking facelift requires the deep muscle foundation to be lifted vertically—counteracting gravity—while the skin is draped softly over it without any tension.
A. Yes. Moles, freckles, and pigmentation are permanent landmarks anchored within your skin layers. Comparing the exact coordinates of these markings in before-and-after photos is the most objective way to verify actual tissue relocation. If the jawline looks tighter but the moles around the mouth haven’t migrated upward, the lift is likely superficial and temporary.
A. When reviewing facelift reviews, look closely at the texture of the skin around the ears and neck. In edited photos, the fine skin pores, tiny hairs, and natural ear folds will look blurred, airbrushed, or completely missing. A trustworthy, high-quality clinical portfolio will always show high-resolution, unedited photos where you can clearly see the natural texture of the skin and the razor-thin, healing incision line.